Showing posts with label recipe. Show all posts

Monday, July 22, 2013

Helping your Kids to Eat their Veggies ~ Fruit and Veggie Popsicles


So I was nice in my title and said "helping" kids eat their veggies, but let's be honest, we have to trick those kids sometimes....hehe.  My oldest son is actually pretty good about eating vegetables.  He likes them as much as you could expect any kid to like them.  His favorites are broccoli and raw carrots.  But if I were try to make him eat a salad he would not even try at this point.

The other day when I picked him up from daycare he asked me if we could go to the store and buy some popsicles (they have been having them at daycare lately since it has been so hot).  I wasn't really hip on the idea of buying a big bag of popsicles with all of the processed sugar and high fructose corn syrup.  Not to mention that I would probably want to eat them too.  So I thought maybe I could make some homemade ones with fresh squeezed (no sugar added) fruit juice.  Then it came to me...a lot of times when we make fresh juice or smoothies we add in veggies and you can't even taste them because the fruit is so sweet.......it adds a lot of vitamins and minerals.  So the fruit and veggie popsicle idea was born.  My husband tells me this is not a new idea but it was new to me and I am very excited about them and controlling the ingredients for my kids.


The first one I made was GREEN.  Tyce loves "green flavored" things (yes green flavored - gotta love kids).  It was made from 3 apples and a generous hand full of spinach.  I juiced both the apples and spinach in my juicer.  It made a nice green color.  Any color apple will work (I used Fuji, granny smith may be too tart).


The next one I wanted to make was ORANGE.  This is Tyce's second favorite color flavoring.  At least orange is also a flavor and not just a color....hehe.  This one was made from 4 large carrots, 2 oranges, 1 lemon, and just a sliver of ginger root.  All of the ingredients I juiced in my juicer.  It was more than enough for my 4 popsicle molds. (I didn't have any oranges left for my picture - poor planning I know).


Next, after all of the blueberry picking we did I just had to make a blueberry version.  It turned out to be my PURPLE popsicle.  It was made from about 1 1/2 cups of blueberries, a generous handful of kale, orange juice and lemon juice.  I juiced some oranges and lemons together in my juicer.  Then in my food processor I added the whole blueberries, kale, and then the orange/lemon juice until I got the desired consistency for my popsicle.


And last but certainly not least was my RED popsicle (kinda pink really).  This was made from almost a whole carton of strawberries, a generous handful of spinach, the same lemon/orange juice mixture from the purple popsicle, and broccoli.  I juiced the broccoli stem (you get a lot of juice from that). I added the strawberries and spinach to the food processor whole and then added enough lemon/orange juice and all of the broccoli juice to get the desired consistency.

So after freezing all night here is the finished product!!  They turned out very yummy and the kids don't know the difference.  Yay!


The green and orange were more classic popsicle consistencies since they were made of only juice.  The purple and red with the fruit purees were more like a whole fruit bar (almost like a frozen smoothie on a stick).


Enjoy!  Let me know in the comments if you have other ideas/recipes for more!


~~~

Tuesday, May 21, 2013

Creamy Cauliflower Mashed "Potatoes"


This is one of my favorite low carb sides.  It is not new but I love this swap for mashed potatoes.  I could honestly have them for the rest of my life and never miss the potatoes. (and I am not a huge fan of raw cauliflower by itself). 

Mashed cauliflower with a pre-made rotisserie chicken for dinner is a super simple and fast dinner for my family. (so no... I did not make that beautiful looking chicken pictured above, but my hubby did cut it up.....but the mashed cauli is all mine)

You need:
1 head cauliflower - chopped
1 T of minced garlic (I buy already chopped in olive oil)
3 oz. cream cheese
1 T parmesan cheese
salt and pepper to taste
a couple sprigs of parsley


Cut up the cauliflower

Boil in water for about 10 minutes or until fork tender

I like to add all of the cheese and garlic to the bottom of the food processor so the hot cauliflower will melt it.

I use a slated spoon to pull out the boiled cauliflower into a bowl lined with a paper towel to absorb the water.  You want to absorb as much water as possible.

Blend together the cheeses, garlic, and cauliflower.  At the end throw in the salt, pepper, and parsley.


Kid tested and a big win!! Also Mommy approved for being yummy and MM neutral!


Tuesday, May 14, 2013

Breakfast for Dinner ~ Low Carb Coconut Flour Pancakes (gluten free, grain free)


Breakfast for breakfast is fine, but why not switch it up and have breakfast for dinner every once in a while?  My family does this alot because it is simple, on the cheaper side, and the kids think it is so fun!

One of the challenges with eating low carb is when you miss things like pancakes.  When I first was searching for low carb recipes I found this one, which I love.  It makes thin little pancakes that kind of taste like French toast.  Simple and tasty.

Now, I know I have said before that I am not creative in the kitchen, but after making a good amount of low carb and paleo baking recipes I thought I could try my hand at some alterations.  I love the pancakes I mentioned, but they are very thin and I wanted to try to add some fluffiness.  I have not been a fan of the pancakes made with almond flour b/c they are too dry and gritty for my liking but then I was introduced to coconut flour and it changed my world.

So here is my altered recipe that is pictured above:

Coconut Flour Pancakes
2 eggs
2 oz. cream cheese
5 drops vanilla stevia (or 1 packet splenda or other sweetner)
1/2 teaspoon cinnamon
1/4 c coconut flour
1/4 c water
1 Tablespoon nut butter - I used my pecan butter but almond would work (peanut butter probably too but it might taste like it a little)
Mix-ins optional - I sometimes add mini chocolate chips for the kiddos or fruit for a MM step 2 option or chopped up nuts

I mix the batter in a magic bullet or any small blender to make sure it is good and combined.  If you want a thinner batter just add more water until you get the desired consistency.  I pour about 1/4 cup per pancake on a griddle for about 2 minutes on each side (you really can't over cook them but thy can be under cooked in the middle so be sure to do what works for your heat level).

You can see that they are pretty fluffy and moist on the inside :)


I may try and substitute the cream cheese/water for some coconut milk next time to make it paleo friendly.......but the hubby does not really dig panckes anyway so my efforts may be wasted.

I added blueberries to half the batch which was amazing!!  I asked Tyce if he liked the chocolate chips or the blueberries better and he said blueberries!!  That's my boy! And these were fresh blueberries so no fake stuff you find in the eggo waffles and such!


If you use 1/4 c blueberries or less this can be your 5 g counter for those on MM.

I hope you like these!  If you try them let me know what you think or any tweaks you have made!!

Tuesday, May 7, 2013

How to Make a Frozen Buttercream Icing Transfer ~ Cow Baby Shower Cake

Frozen buttercream icing transfer techniques
Cow Jumped Over the Moon - baby shower cake


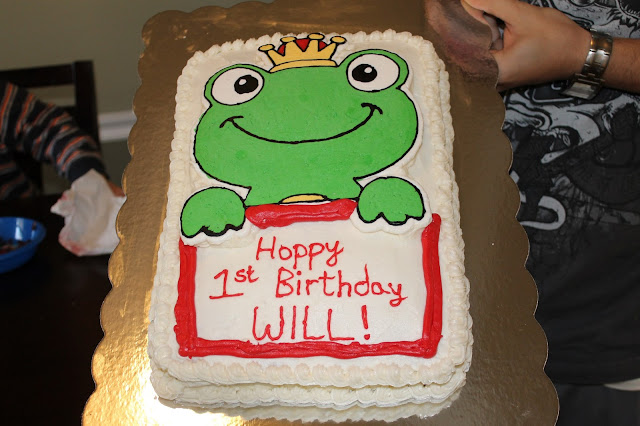
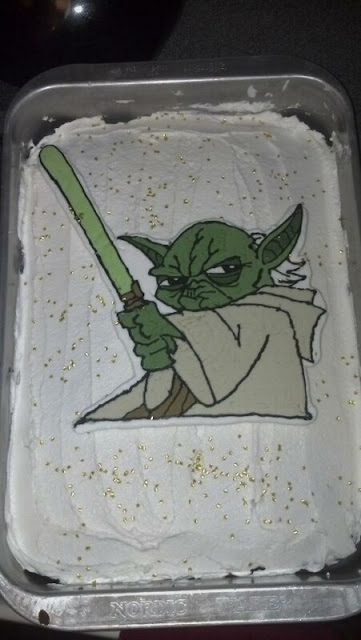
This is a picture of the cake that I had mentioned before that  I made for my sister's baby shower this weekend.  I used a technique for the picture of the cow that I learned last year called a frozen buttercream icing transfer.  It is really easy especially for someone artistically challenged like myself.  Here are a few other ones I have done (the Yoda one was while I was teaching my sister-in-law how to do it and she did most of it - great job Sarah!) - This is in no way any kind of health friendly but it is a special occasion cake for pete's sake :)


Other frozen buttercream transfers I have done (or taught):
diego cake
DIEGO AND BABY JAGUAR (GO DIEGO GO)


frog birthday cake
FROG PRINCE

yoda birthday cake
YODA (STAR WARS)
Update 1/4/15:  Just a few more cakes I have done since this post...

Barney cake

Super hero cake - spider man, superman, hulk, fantastic 4


So here is a guide on how to do this yourself with a few tips along the way.  To start just find any image that you want to put on your cake.  Some suggestions are coloring book pages or simple images.  The less intricate details the easier it will be, but you can pick whatever picture you want.  After you choose your image you want to print it or copy it in a mirror image of what you actually want it to look like on the cake (it will be backwards as you are working on it).


The image on the left is the original image that I drew some extra details on.  The image on the right is the mirror image (cleaned up a bit).  Make sure your image is going to fit onto the actual size of cake you are using)

 You will need a cookie sheet (or some other hard flat surface that is portable enough to transfer to the freezer), some kind of decorating bags, icing tips, wax paper, tape, black decorating icing, food coloring, and your mirror image.


I use Wilton tips and food coloring.  They tend to work the best for me.  Liquid food coloring seems to look a little marble-y. (By the way I have no financial interest in Wilton, they just make good products).

 For the outlining I recommend using the pre-made black decorating icing.  If you try to make your own black icing it will take a lot of coloring and probably won't taste good. 

 Tape the image to the cookie sheet making sure it is completely flat and secure.  You don't want it to move on you.

 Cut the wax paper to a size that completely covers the image and tape it to the cookie sheet.  Again, you do not want this to move on you after you start.

 Take the black icing with a small circle icing tip (I used a #2 tip here).  Start outlining the entire image in the black. What you are going to see is on the back side (touching the wax paper) so the little raises in the icing when you move is just fine, you won't be able to see it in the end.

 All of the outlining done.

 If you happen to have any black in the image that needs to be filled in, then go ahead and do that after you are done outlining.  Then stick the cookie sheet w/ image in the freezer for at least 15 minutes.


 While your image is freezing you can make all of the other colors of icing you need for your picture.  I use Wilton's buttercream recipe.  No matter what icing recipe you make just be sure that it is at least 1/2 butter (not all shortening or it will not freeze correctly).

 Next, pull your outlined image out of the freezer and fill in between the outlined area with the correct color for your image. The black will be frozen and hard at this point.  Make sure to touch the color to the outline so there are no gaps.  Since you only will see what is on the part touching the cookie sheet then it doesn't matter if you go over the back of the black icing with the color icing.

 After all the color has been added to the cow.  As you can see, I have covered up some of the black outlines.

 After the whole image is colored in, then you can put the cookie sheet back into the freezer for at least another 15 minutes (more is fine).  While in the freezer, you want to make the icing for the last step.  Whatever color you will ice the cake with is what you want to use for the backing.  This way the image will look like it blends into the cake.  I was using baby blue.

 With the cake color you want to outline the entire image and you should just barely go to the outside of the original black outlining.

 Then fill in the entire back side of the image with the cake color.  You can spread this flat so it will sit level when you put it on the cake.  Your whole icing transfer should be approximately 1/4-1/2 inch thick.  Stick the cookie sheet back in the freezer for a minimum of 45 minutes.  I usually do this the night before and leave it in the freezer overnight.

 After the image is completely frozen, remove the tape from the cookie sheet with the wax paper still attached.  Flip the icing transfer over and place in the desired location on the cake.  Slowly peel off the wax paper to see your image. 

cow jumped over the moon nursery cake
 As the image thaws it will be just like normal icing.  You can cut right through it to serve the cake.  If you are worried about the icing melting (summer) then just stick the whole cake in the fridge until you are ready. But it should be fine at room temp.

Now you are done.  Just add any writing or other decorations you want!!  Now you can make any image you need when you get difficult requests (like when my son wanted a Diego cake WITH baby jaguar) :)

Hopefully you will enjoy this!!  Post any questions below!
Related Posts Plugin for WordPress, Blogger...